nkia-server
npia-server
Table of Contents
Description
This project aims not only to demonstrate a proper use case for npia-api but also to
offer a production-ready implementation of npia-api compliant system (and as usual for me, it doesn’t reach the level at this point ʘ‿ʘ).
This repository holds two examplary (and hopefully someday production-grade) systems that implement somewhat distinct
interfaces to interact with npia-api. Each system is as follows.
-
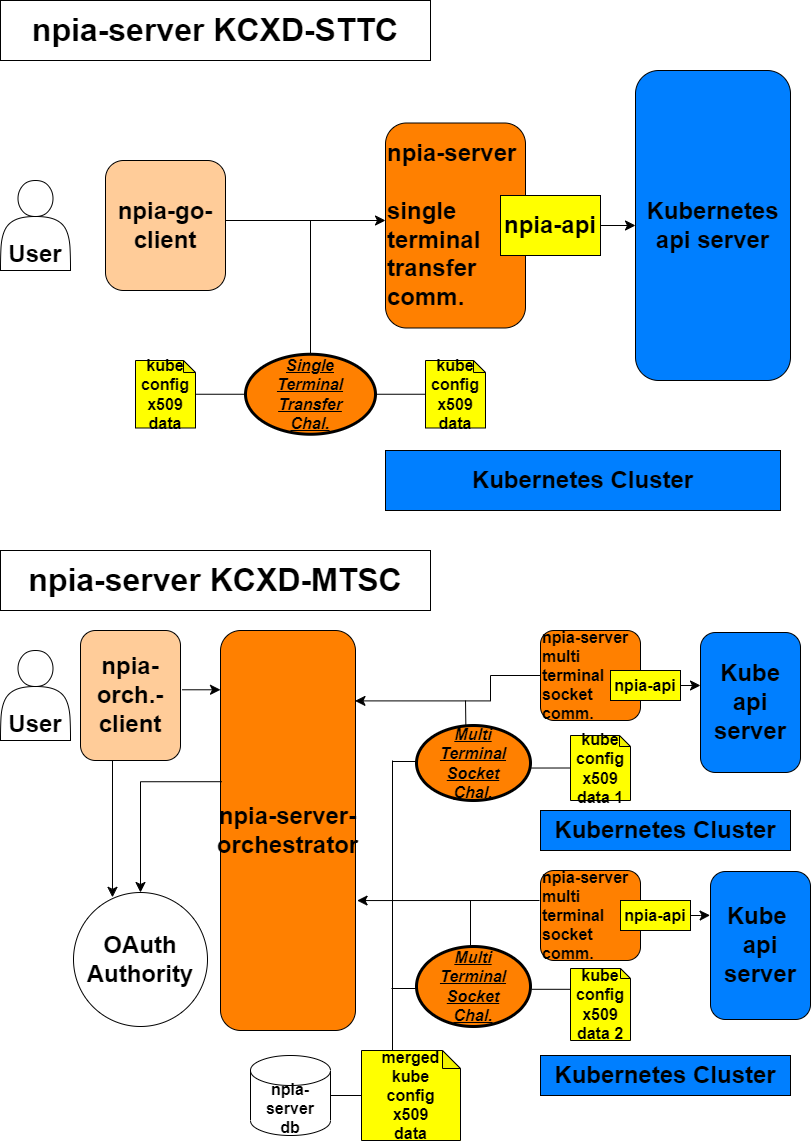
Http server that implements KCXD-STTC Protocol (you think it’s a bogus word? Well… it was until now! See Security section to
know what on earth that means) to handle secure http query from a compliant client, ex) npia-go-client -
Web socket hub that implements KCXD-MTSC Protocol (again, Security) to handle secure web socket query from a compliant client
ex) the code in src/sock directory implements this, ex2) also, orchestrator/ofront will implement this protocol in future release, but for now,
it relies on oauth2 based https connection for security. This means, oauth2 user must (please!) configure properly the external
reverse proxy (nginx, per se) to handle https:// and wss://.
Project Overview
The blueprint for the repository is as follows.
The tree structure for the repository is as follows
├── debug_bin
├── debug_build_run
├── debug_cleanup
├── docs
├── go.mod
├── go.sum
├── LICENSE
├── orchestrator
│   ├── debug_amalgamate_bin
│   ├── debug_amalgamate_config
│   ├── docker-compose.yaml
│   ├── odb
│   ├── odebug_build_run
│   ├── odebug_cleanup
│   ├── ofront
│   │   ├── config.json
│   │   ├── ocontroller
│   │   ├── omodels
│   │   ├── omodules
│   │   ├── orouter
│   │   └── oview
│   └── osock
├── src
│   ├── controller
│   ├── modules
│   ├── router
│   └── sock
├── test
│   └── kindcluster
└── var
Let me guide you through the each entrypoint briefly.
-
debug_bin
Stores a kubeconfig file that holds information about two clusters for testing npia-server. -
debug_build_run
Is a Bash script for compiling and setting up the executable and base environment\ for testing npia-server. -
debug_cleanup
Is a Bash script for cleaning up the artifacts and environment used for testing
npia-server. -
docs
Is what it says it is. -
go.mod, go.sum
Define the directly and indirectly required modules for functioning apis. -
LICENSE
Is what it says it is. -
orchestrator
Stores a docker-compose manifest file for building and running components that make up
orchestrator system while also has Bash scripts for testing it
Caveats: if you already have a running cluster and corresponding kubeconfig file,
DO NOT run the script “odebug_build_run” without backing up your original
kubeconfig, because the script will obliterate that one -
orchestrator/debug_amalgamate_bin
Stores “amalgamation tools” used when testing the orchestrator system, which means that
the tools handle automatically baseline components needed for having a functioning
orchestrator system, including merging two test kubeconfig files into one and then
generating encryption key and putting encrypted merged file into the db -
orchestrator/debug_amalgamate_config
Stores the two test kubeconfig files used for testing the orchestrator system -
orchestrator/odb
Stores image and container information for running orchestrator database. -
orchestrator/ofront
Holds the front part (meaning user-facing on the browser) of the orchestrator system, including
configuration file needed for Google oauth. -
orchestrator/ofront/ocontroller
Stores controller logic for handling user request regarding access and oauth authentication. -
orchestrator/ofront/omodels
Stores database querying logic for handling user request regarding access and
oauth authentication and also storing orchestrator socket request key. -
orchestrator/ofront/omodules
Stores orchestrator gadgets that include primarily oauth modules and configuration. -
orchestrator/ofront/orouter
Stores access paths information for users to access the orchestrator. -
orchestrator/ofront/oview
Stores html and template assets to render on the user’s browser. -
orchestrator/osock
Stores socket connection endpoints and handling logic for both oauth-ed front user and
challenge-passed server socket client and the hub channels for both sides to talk to each
other. -
src
Stores entry and initiation logic for both npia-server STTC host and npia-server MTSC client. -
src/controller
Stores various data structures and logic for interacting with npia-server that inlcude
npia-api wrapper, challenge protocol handler, network communication data structures, and
npia-multi-mode handler so and so. The data structure and logic defined and implemented in here are used across,
but not limited to, this project. Those are exported to other projects such as
npia-go-client. -
src/modules
Stores various data structures and logic primarily related to asymmetric/symmetric
encryption/decryption algorithms and certificate authentication methods that are all
building blocks of KCXD Challenge Protocol. -
src/router
Stores endpoints where clients programs can access the server, get authenticated
through challenges and make query to npia-api -
src/sock
Stores functions that make up a socket client for connecting to the orchestrator hub, handling
challenge protocol, and sending to/receiving from it using crypto algorithms. -
test
Stores testing materials -
test/kindcluster
Stores scripts and config files for setting up working kind Kubernetes cluster for testing purpose -
var
Has various this and that artifacts when developing the server
Details
This section dives into the details of each entry point.
However, it doesn’t go so deeper that you don’t have to look at the source code to understand how everything works in conjunction.
For even more details, refer to specific comments associated with a code block, or better, you could just run it yourself.
debug_bin
- config
Is a kubeconfig file that holds the information of two kind clusters that don’t exist
on earth anymore.
orchestrator
-
docker-compose.yaml
Is a docker-compose manifest file that defines the build directory for each orchestrator
component and the way they run. -
odebug_build_run
Is a Bash script that consists of command lines to set up a test environment of orchestrator.
It merges two configs in the orchestrator/debug_amalgamate_bin into one, generates an
encryption key, encrypts the merged config file and puts the file into the orchestrator db. -
odebug_cleanup
Removes all the environments created using orchestrator/odebug_build_run
orchestrator debug_amalgamate_bin
-
amalgamate
Is a Bash script that is used by orchestrator/odebug_build_run and handles the job of
actually merging two kubeconfig files. -
amalgamate.go
Is a program that generates AES GCM key and consumes merged kubeconfig file to output
both the symmetric key and finally the encrypted kubeconfig file.
orchestrator debug_amalgamate_config
-
config1
the first kind Kubernetes cluster config for testing out npia-server. -
config2
the second kind Kubernetes cluster config for testing out npia-server.
orchestrator odb
-
Dockerfile
Defines how the MySQL database should be built as a container image, picking up the
encrypted kubeconfig file along the way -
init.sql
Defines how the MySQL database should be initiated inside a created container, inserting
pre-defined information along with the encrypted kubeconfig file into corresponding columns.
orchestrator ofront
-
Dockerfile
Defines how a golang server environment should be built and initiated inside a container
image. -
config.json
Holds information for later use when user is trying to authenticate through Google OAuth
channel.
It consists of two fields, GOOGLE_OAUTH_CLIENT_ID which is client id retrieved when
registering the oauth process on cloud.google.com and GOOGLE_OAUTH_CLIENT_SECRET which is
also retrievable at the time you register the process on the platform along the client id. -
ofront.go
Is a main entry for creating and running the Go Gin server that serves the front user.
orchestrator ofront ocontroller
- ocontroller.go
Has functions for serving index html file and /orchestrator template page, redirecting
to and managing access to /orchstrate if session is present and authenticated,
and Google oauth initiation along with callback
orchestrator ofront omodels
- omodels.go
Has functions to handle database query and check access authenticity, register front-user
session id with socket request key if the user has successfully passed oauth process.
orchestrator ofront omodules
-
config.go
For now, has a function to read the orchestrator/ofront/config.json and a data structure to
store the data -
ooauth2.go
Has functions to set session cookie and get user data from Google after the front user got
redirected to authenticate with the Google server.
Also it has data structures to hold the oauth2 configuration and Google oauth result to
check if the oauth process has been successful.
orchestrator ofront orouter
- orouter.go
Has paths for front user to access which are main landing page, and another page
where orchestrator call is made, and two others for conducting oauth2 authentication.
orchestrator ofront oview
-
index.html
Is what it says it is. -
orchestrator.tmpl
Is where, after the authentication, the front user makes call to the orchestrator hub to
retrieve api processing result from the npia-server sock agent.
orchestrator osock
-
Dockerfile
Defines how the orchestrator socket image should be built and run inside a container. -
osock_front.go
Has a function to handle the initial authentication challenge from the front user web socket
connection and maintain the connection if the authentication is successful.
Upon successful authentication, it keeps a runtime mapped record for a websocket
connection identifier along with a corresponding user id. -
osock_modules.go
Has functions for orchestrator/osock system to interact with orchestrator/odb and
checking session before returning corresponding user email against a submitted
request key, decrypting the user’s amalgamated kubeconfig file stored inside the
database. -
osock_server.go
Has a function to handle the initial authentication challenge from the server sock agent
web socket connection and maintain the connection if the authentication is successful.
Upon successful authentication, it keeps a runtime mapped record for a websocket
connection identifier along with a sysmmetric key used for secure communication and also,
the front user socket search key for finding the web socket to send the api result to. -
osock.go
Defines database connection information and socket endpoint address for both the front
user and the server sock agent to connect to, and the dynamically mapped records that
will hold the bidirectional reference for both the front user and server sock agent
socket connection.
Also, it has a function to initiate the base environment for orchestrator/osock to
properly run
src
- main.go
Is a main entry for npia-server to be up and running either as a single terminal
transfer communication mode or a multi terminal socket communication mode.
Along with that, it checks and sets up the base environment for npia-server to
properly run.
src controller
-
api.go
Is the core interface to relay the user-sent query to the npia-api when the server is
in single terminal transfer communication mode.
It receives the query content delivered inside the request body, decrypts it, formats it
to send to npia-api, retrieves the result, and finally encrypts the byte format result
then sends it back. -
auth.go
Has a function to handle the entire single terminal transfer challenge process. -
check.go
Checks status. -
definition.go
Has all fundamental data blocks for communicating with npia-server components and
within components. It defines how the api request/response data sent to/from npia-server
should look like, and how the challenge protocol data should be formatted, and finally
when using multi terminal socket communication mode, how the data sent to/from the
orchestrator should look like. -
multimode.go
Implements npia-multi-mode handler on the server side as api callable structure
src modules
-
auth.go
Holds all functions that uphold the single terminal transfer challenge and
the multi terminal socket challenge. Not only that, it also contains function for generating the challenges and verifying
them for both single terminal transfer communication mode and multi terminal socket
communication mode. -
definition.go
Has the baseline data structures for the sttc and mtsc protocol. -
utils.go
Holds all building blocks that make up the challenge functions which include
public key and private key encoding, extraction of those from the kubeconfig
and asymmetric, symmetric encryption, secure random byte generation,
certicate verification, etc.
src router
- router.go
Defines main entries to which npia-go-client or whatever that is compliant with the
apistandard and KCXD Challenge Protocol can access and send data
src sock
-
module.go
Defines and implements Go routine read channels for sequential challenge-then-listen,
and write channel for interacting with orchestrator challenge signals and front-user
query sent through it. -
sock.go
Has an entry logic for running the multi terminal socket commuincation mode and the
storage to keep the symmetric key to encrypt/decrypt the message after the successful
authentication
test kindcluster
-
kindcluster.sh
Is a Bash script for up and running kind Kubernetes clusters for testing purpose. -
kindcluster1.yaml
Is a yaml config file for the first test-purpose kind Kubernetes cluster -
kindcluster2.yaml
Is a yaml config file for the second test-purpose kind Kubernetes cluster
Security Model
Warning
1. DO NOT USE PLAIN HTTP CHANNEL WHEN ACCESSING FRONT, YET!
2. DO USE YOUR OWN OAUTH CREDENTIAL!
Model Description
This page is about the problematic bogus words appearing excessively frequently
throughout the whole documents,
-
KCXD (Kubeconfig X509 Data)
Under the hood, when executing kubectl command, a thing called Bidirectional X509
between kubectl client and kube apiserver happens to authenticate mutual integrity.
Kubeconfig is used for that protocol and npia-server decided to build a protocol
upon the data which is assumed to be sharable (or not! haha) if client and server are
set up by the same entity. -
STTC (Single Terminal Transfer Challenge, or Communication)
Using KCXD, it is a protocol between http client and server which targets
single-terminal oriented requests and responses. -
MTSC (Multi Terminal Socket Challenge, or Communication)
Using KCXD, it is a protocol between front and orchestrator and sock client which
targets multi-terminal oriented web socket requests and responses.
Model Overview
The blueprint for KCXD Challenge Protocol is as follows
1. STTC (Single Terminal Transfer Challenge)
2. MTSC (Multi Terminal Socket Challenge)
Model Details
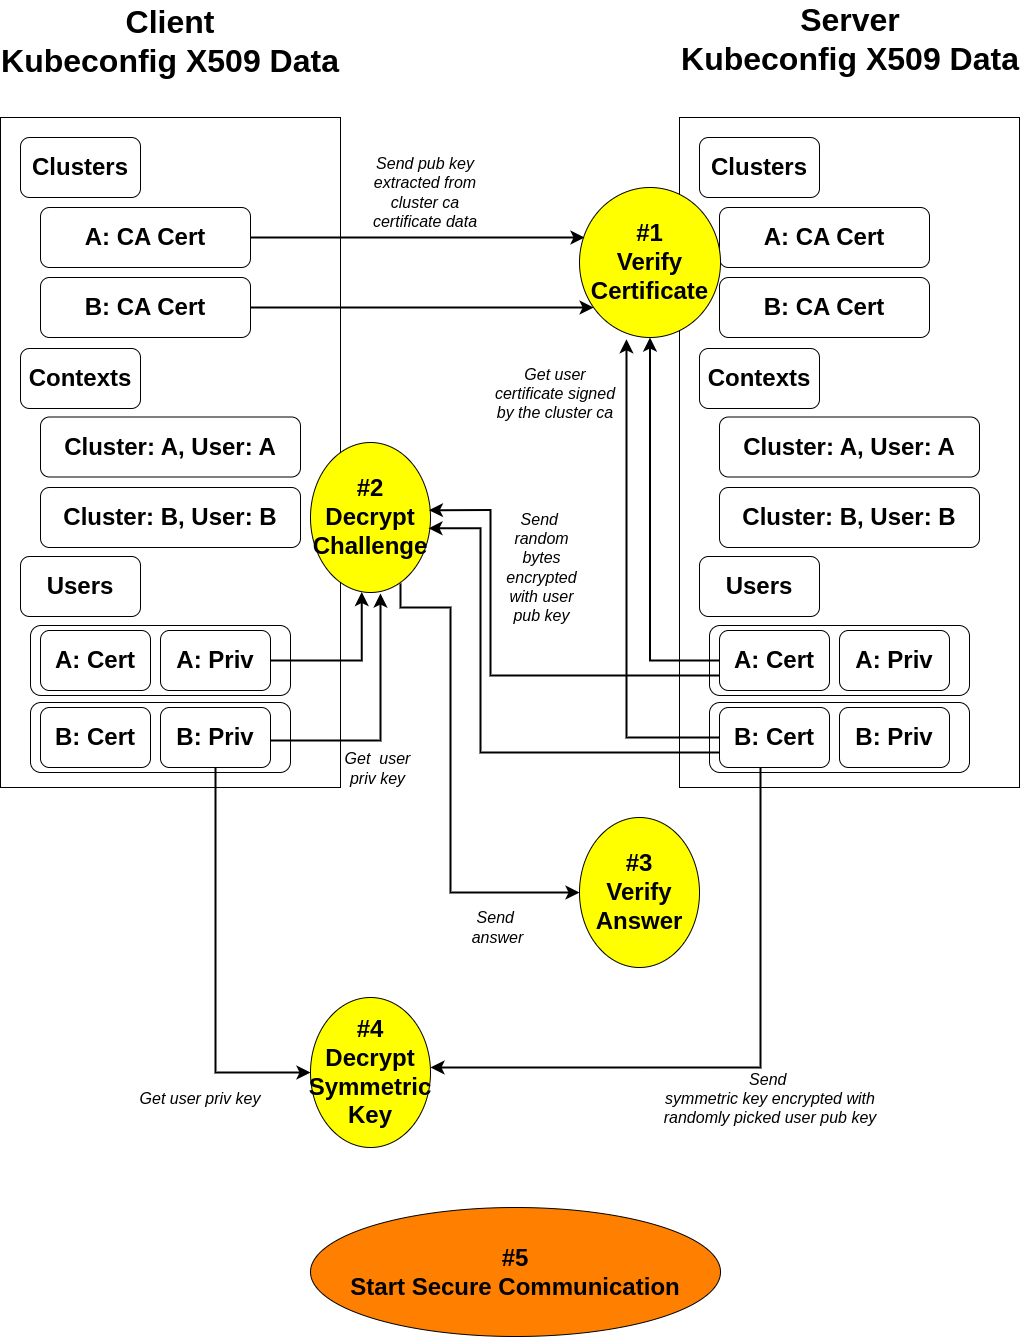
STTC (Single Terminal Transfer Challenge)
-
In order for this protocol to be successfully resolved, client and server
must share the exactly same kubeconfig files. -
According to its contexts fields, client extracts all available
certificate-authority-data’s public keys, which are kubernetes root ca’s
public keys, and sends them all with each corresponding context cluster name.
Now, upon receiving that information, server verifies if the public keys are
the ones that it has by using those keys to verify the context user’s certificates,
which are supposed to be signed using kubernetes root ca’s private keys if authentic. -
Now, if the verification is successful for each and every user’s certificate,
it’s time for server to assign a challenge id and random bytes of 16 - 32 length for
each and every context user, store it, encrypts the random bytes using each context
user’s public key, which can be extracted from the kubeconfig context user’s certificate
data, and sends the data back to client.
Upon receiving this, client must remember the challenge id and for each and every entry
of context user, decrypt the challenge with corresponding private keys which are accessible
from the kubernetes context user’s private key data. -
If each and every challenge is decrypted, client sends the answer attached to the
challenge id it received. -
If each and every challenge is correctly decrypted, server then assumes that the
counterpart has the same kubeconfig file and generates a session key for the client,
pairs it with the session’s unique symmetric key for AES-GCM algorithm, encrypts
the key with randomly picked context user’s public key, and finally sends it back
to the client with the context user name as a field key. -
Finally, upon receiving it, client decrypts the data with the corresponding private
key of the user, stores the symmetric key, and starts encrypting the communication data.
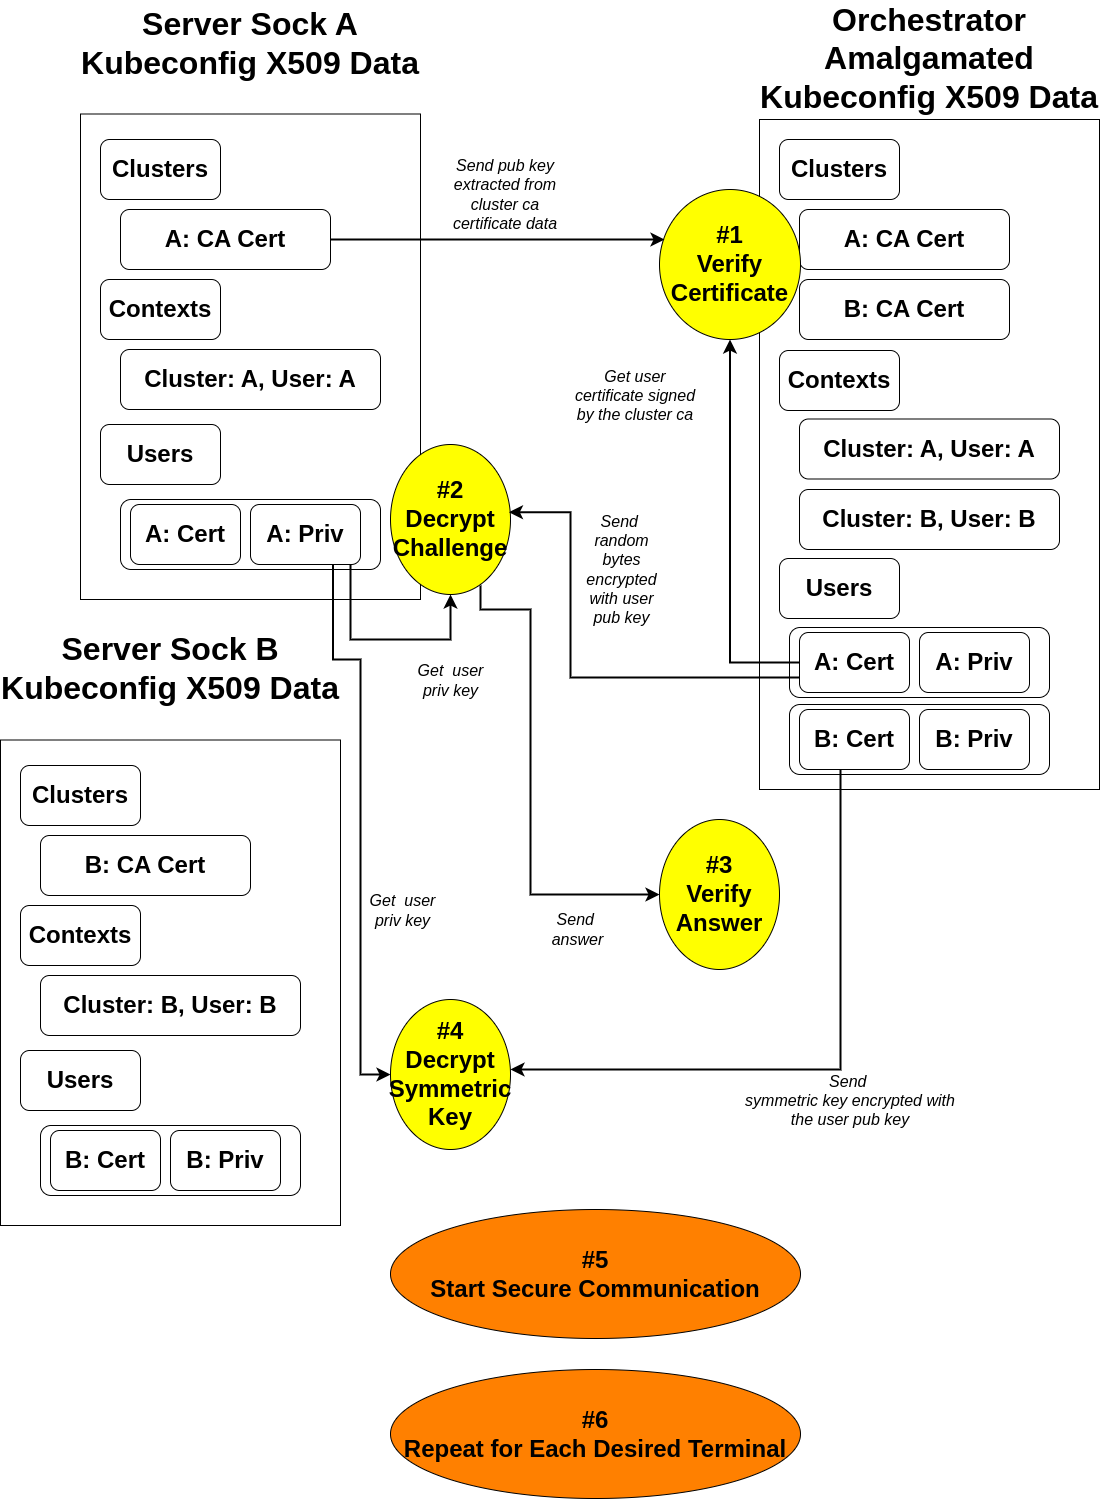
MTSC (Multi Terminal Socket Challenge)
- In order for this protocol to be successfully resolved, server sock must have
only one, exact, and whole subset of the orchestrator side’s kubeconfig file.
Going forward, server sock will be referred to as “client” and orchestrator
will be referred to as “server”
-
According to its contexts field, client extracts the certificate-authority-data’s
public key, which is kubernetes root ca’s public key, and sends it with a corresponding
context cluster name.
Now, upon receiving that information, server verifies if the public key is
the one that it has by using the key to verify the context user’s certificate,
which is supposed to be signed using kubernetes root ca’s private key if authentic. -
Now, if the verification is successful for ethe user’s certificate,
it’s time for server to assign a challenge id and random bytes of 16 - 32 length for
the context user, store it, encrypts the random bytes using each context
user’s public key, which can be extracted from the kubeconfig context user’s certificate
data, and sends the data back to client.
Upon receiving this, client must remember the challenge id and for the context user,
decrypt the challenge with corresponding private key which is accessible
from the kubernetes context user’s private key data. -
If the challenge is decrypted, client sends the answer attached to the
challenge id it received. -
If the challenge is correctly decrypted, server then assumes that the
counterpart has the one, exact, and whole subset of kubeconfig file that it has and
generates a session key for the client,
pairs it with the session’s unique symmetric key for AES-GCM algorithm, encrypts
the key with the context user’s public key, and finally sends it back
to the client with the context user name as a field key. -
Finally, upon receiving it, client decrypts the data with the corresponding private
key of the user, stores the symmetric key, and starts encrypting the communication data. -
From server’s point of view, if there are more than one client terminal, it iterates
the process for each terminal that wants to connect to the server.
Scenario
Scenario Description
This page is about basic examplary scenarios for each mainline use cases & implementations of
-
KCXD-STTC (Kubeconfig X509 Data based Single Terminal Transfer Communication)
-
KCXD-MTSC (Kubeconfig X509 Data based Multi Terminal Socket Communication)
1.
Single Terminal Transfer Communication Mode
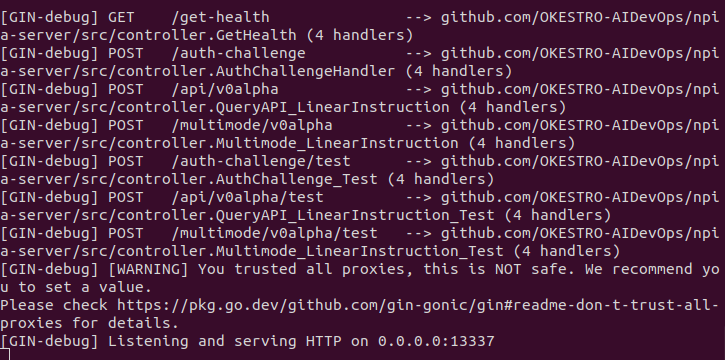
1-1. Initiate npia-server STTC mode
In the below screenshot, you can see the gogin server is running
in debug mode, showing all available endpoints.
Here, our points of interest are those suffixed with /test paths since,
yes, this is a test.
1-2. Run npia-go-client debug script for STTC mode test client
In the below screenshot, what you see is the npia-go-client’s piece of script
where you can check out a simple test interaction with the npia-server in
STTC mode which involves single terminal transfer challenge and api querying.
1-3. Check if the STTC Challenge Protocol and subsequent api queries have been successful
In the below screenshot, you can see that the first two requests have been made to
resolve challenge protocol authentication and the following api query, followed by
two more queries to initiate multi mode and then switch to another target cluster.
We can be sure the challenge was succefult since the latter three requests never return
200 status in the case of unsuccessful authenticaton.

1-4. Check if the STTC client has received what it wanted
Voila, it has!
2.
Multi Terminal Socket Communication Mode
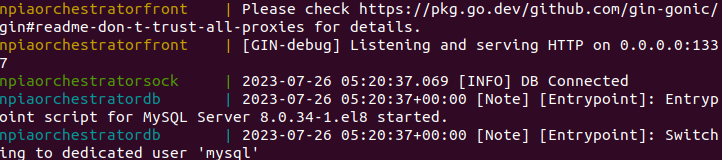
2-1. Initiate npia-server MTSC mode
In the below screenshot, you can see the orchestrator components are
up and running as containers.
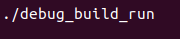
2-2. Initiate npia-server MTSC socket client
With a manually compiled src executable, using the below command will make
a debugging connection to the orchestrator

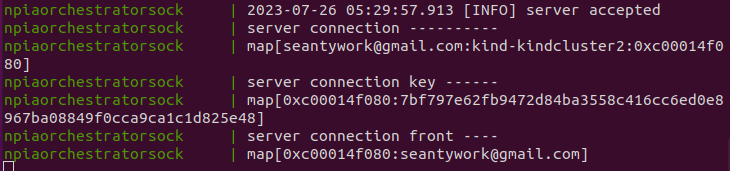
2-3. Check if MTSC Challenge Protocol has been successful and connection is maintained
If the challenge protocol has been successful and connection is
accepted, you will see something like the below screenshot.
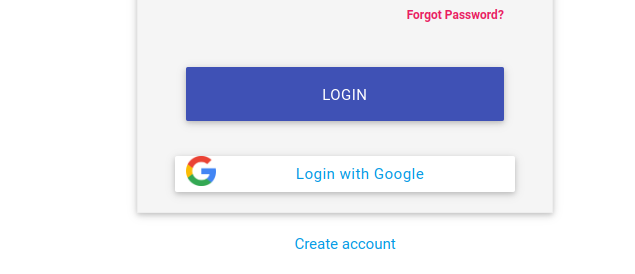
2-4. As a front-user, conduct oauth2.
As the below screenshot, you will see the page popping up if you first access the default
path.
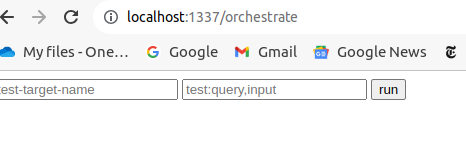
2-5. If OAuth is successful, you are ready to orchestrate multiple terminals
Just like the below screenshot, you will have an interface to query multiple terminals
manifested and connected to the orchestrator.
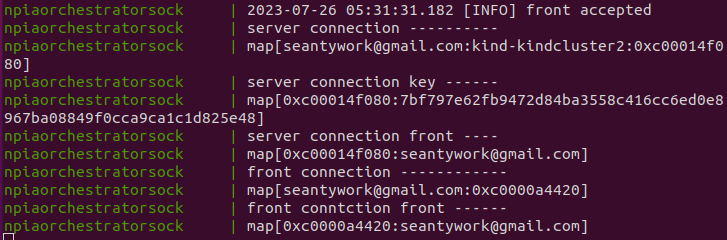
2-6. Meanwhile, check if front connection was successful.
If the oauth has been successful and connection to the orchestrator is
accepted, you will see something like the below screenshot.
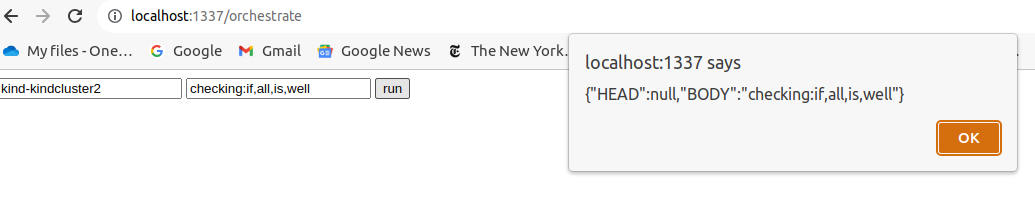
2-7. Now, let’s see what happens if we actually make a query
As you can see, feeding proper arguments into the input fields and hitting run,
the requested message will travel through the orchestrator, making it to the other
side, getting processed, and travel back through the orchestartor to reach the
client browser.
2-8. Check if the message touched the orchestrator
You can see it reached the front handler and got sent to the sock client.

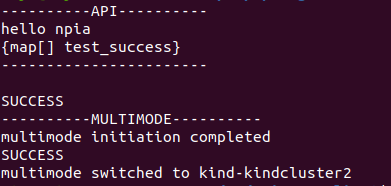
2-9. Check if the message reached the npia-server MTSC mode client
Yep, all good.
